
Table of Contents
- Understanding Tennis Serve Biomechanics: The Complete Breakdown
- The Five Phases of a Tennis Serve
- How the Kinetic Chain Powers Your Tennis Serve
- Tennis Serve Technique: Building a Solid Foundation
- Tennis Serve Shoulder Injury Prevention: Protecting Your Arm
- Tennis Serve Drills for Consistency: Progressive Practice Routines
- Self-Assessment: Evaluating Your Serve Using Video Analysis
- Troubleshooting Common Serve Problems
- Featured Snippet Optimization
- Frequently Asked Questions
Last Updated: October 6, 2026
Understanding Tennis Serve Biomechanics: The Complete Breakdown
Tennis serve biomechanics for recreational players isn’t about copying professionals. It’s about understanding how your body generates power efficiently, reduces injury risk, and builds consistency.
The serve is the most complex stroke in the game, demanding coordination from feet to fingertips.
Why Biomechanics Matter for Your Game
Most recreational players try to improve by hitting more balls.
Biomechanics gives you a framework. When you know how energy flows from the ground into the racquet, you can diagnose problems accurately.
The Kinetic Chain Concept
The kinetic chain is the sequence of body segments working together to generate and transfer power.
When segments fire in order, power builds; out of sequence, energy leaks.
The chain works because it uses your largest muscles first (legs) and finishes with the smallest, fastest (wrist), creating a whip effect that generates racquet-head speed without excessive force through any single joint.
The Five Phases of a Tennis Serve
The serve breaks into five distinct phases, each with specific biomechanical requirements. Understanding each helps you identify where your technique needs work.
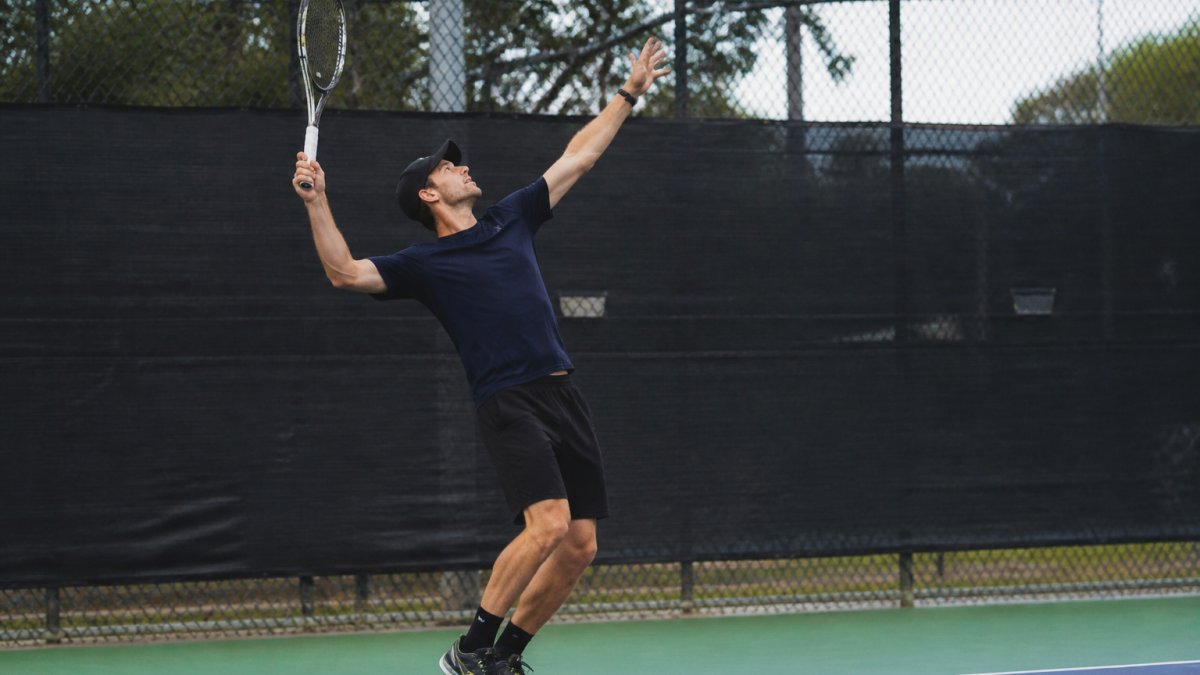
Phase 1: Ready Position and Stance
Stand sideways to the baseline with feet shoulder-width apart, knees slightly bent, weight on the balls of your feet.
The ready position sets up everything. Too narrow a stance loses base stability; too wide and you can’t generate leg drive.
Phase 2: The Toss and Loading
The toss determines consistency more than most players realize.
During the toss, your knees flex deeper and your weight shifts onto the balls of your feet, the coiling phase.
Common mistake: rushing the toss. A smooth, deliberate toss gives you time to load properly and time your racquet acceleration.
Phase 3: The Backswing and Cocking
As the ball rises, your racquet arm drops into the “waiter’s-tray” position, elbow bent, racquet head behind your head, palm facing upward.
Your trunk continues rotating, hips begin their rotation, and the non-racquet arm comes down for balance and timing.
Phase 4: Acceleration and Contact
This is where power happens. Your legs drive upward, extending knees and ankles. Your hips rotate forcefully, followed by your trunk.
Contact occurs when your arm is nearly fully extended, typically 12-18 inches in front of your body and above your head. Racquet-head speed peaks here, combining linear velocity from arm motion and rotational velocity from wrist snap.
Timing is everything. Contact too early or too late and you lose power and accuracy.
Phase 5: Follow-Through and Recovery
After contact, your racquet continues across your body naturally. Your back leg comes off the ground, weight transfers forward, trunk continues rotating, and shoulders relax.
The follow-through is a deceleration phase that protects your shoulder.
How the Kinetic Chain Powers Your Tennis Serve
The tennis serve kinetic chain converts ground reaction force into racquet-head speed. Understanding each link helps you diagnose and fix serve problems.
Ground Reaction Force and Leg Drive
Your serve begins with your feet pushing against the ground.
Your legs contain your body’s largest muscles. When you extend your knees and ankles explosively, you create a foundation of power.
Knee flexion during loading stores energy that releases upward during acceleration.
Hip and Trunk Rotation for Energy Transfer
After your legs drive upward, your hips rotate.
Your trunk rotation follows your hip rotation, not simultaneously, but sequentially.
Studies on serve biomechanics show that players with greater hip and trunk rotation generate higher ball speeds, even when arm strength is similar.
Shoulder and Arm Sequencing
After your trunk rotates, your shoulder accelerates.
Shoulder internal rotation happens next, followed by elbow extension and finally wrist snap.
Your arm doesn’t generate power in isolation, it’s the final link in a chain that starts with your legs.
Tennis Serve Technique: Building a Solid Foundation
Solid technique prevents injuries and builds consistency. Focus on these fundamentals before worrying about power or spin.
Grip and Racquet-Arm Loading
The continental grip is standard for most players, your index finger and thumb form a V pointing toward your right shoulder (for right-handed players).
Racquet-arm loading refers to how your arm and racquet position during cocking.
Many recreational players load too early or too late.
Shoulder External Rotation and the Waiter’s Tray Position
In the waiter’s-tray position, your shoulder is maximally externally rotated, creating a stretch in your rotator cuff muscles.
The stretch is purposeful. When muscles are stretched and then contract, they generate more force, the stretch-shortening cycle.
The waiter’s-tray position looks relaxed but is a position of high muscular tension.
Wrist Motion and Racquet-Head Speed
As your arm extends and your elbow straightens, your wrist remains slightly cocked.
Wrist motion is the final link in the kinetic chain, not the most important (that’s your legs), but significant.
Many recreational players either don’t snap their wrist or snap too early.
Tennis Serve Shoulder Injury Prevention: Protecting Your Arm
Shoulder injuries are common among recreational players, especially those over 40. Understanding the loads on your shoulder helps you prevent injuries.
Common Shoulder Loads and Overuse Patterns
Your rotator cuff must stabilize your shoulder joint while larger muscles generate power.
Overuse injuries develop when you repeat a movement pattern too frequently without adequate recovery.
Age matters. Players over 40 often have reduced shoulder mobility and weaker rotator cuff muscles.
Technique Adjustments to Reduce Joint Stress
Proper sequencing reduces shoulder stress. When your hips and trunk generate power, your shoulder doesn’t have to work as hard.
External rotation shouldn’t be excessive.
Contact point matters. Contacting the ball too far in front or behind increases shoulder stress.
Recovery and Dosage Guidelines
A common guideline is to limit practice serves to 100-150 per session for recreational players.
Recovery between sessions matters. A pattern of serving hard, then taking a day off, then serving again is safer than consecutive days of heavy serving.
Shoulder-specific exercises help prevent injury.
Tennis Serve Drills for Consistency: Progressive Practice Routines
Drills build consistency and groove proper movement patterns. Start with basic drills and progress to match-simulation drills.
Drill 1: Toss Accuracy and Timing
Practice tossing without hitting.
Once your toss is consistent, add the swing. Hit serves focusing on timing racquet acceleration with the toss apex.
Dosage: 20-30 tosses without hitting, then 20-30 serves with focus on timing. Perform 2-3 times per week.
Drill 2: Kinetic Chain Sequencing
Start in your cocking position, racquet loaded, body coiled.
Perform this slow-motion sequence 10 times, then hit 10 serves at normal speed.
Dosage: 10 slow-motion rehearsals, then 10 serves at normal speed.
Drill 3: Serve Accuracy Targets
Set targets on the court, cones or tape marks at the corners and middle of each service box.
As you improve, make targets smaller or move them closer to the lines.
Dosage: 40-60 serves total, distributed across multiple targets. Perform 2-3 times per week.
Drill 4: Match-Simulation Serving
Hit serves as if you’re in a match.
Your first serve should be aggressive; your second serve reliable but still with some pace.
Dosage: 20-30 serves total, performed 1-2 times per week.
Self-Assessment: Evaluating Your Serve Using Video Analysis
Video is one of the most useful tools for serve improvement. A smartphone works fine.
What to Look For in Your Serve Video
Film from the side, perpendicular to the baseline, to see the full kinetic chain. Record 10-15 serves to see patterns.
Watch for these key positions:
- Ready position: feet shoulder-width apart, knees slightly bent, weight on balls of feet
- Loading: deeper knee bend, weight forward, racquet moving into cocking position
- Cocking: elbow at shoulder height, racquet behind head, shoulder externally rotated
Deviations from these positions often explain serve inconsistency.
Common Technique Flaws and How to Spot Them
Weak leg drive: Knees don’t flex much during loading or extend during acceleration. You’ll see minimal upward movement.
Inconsistent toss: Your toss drifts or varies in height, forcing you to adjust your swing on every serve.
Troubleshooting Common Serve Problems
Most serve problems stem from a few common issues. Identify your problem, then apply the fix.
Inconsistent Toss and Loss of Control
The problem: Your toss varies in height or landing spot, forcing you to adjust your swing on every serve.
The fix: Practice tosses without hitting. Focus on a smooth, deliberate release, the ball should roll off your fingertips, not be thrown.
Netted Serves and Contact Point Issues
The problem: You’re hitting serves into the net or long, not controlling the contact point.
Why it works: Contact point is where racquet angle and swing path determine where the ball goes.
Lack of Power and Racquet-Head Speed
The problem: Your serve lacks velocity.
The fix: Check your kinetic chain sequencing. Are your legs driving?
Why it works: Racquet-head speed comes from proper sequencing, not arm strength.
At Crunch Time Coaching, we emphasize that serve improvement happens through understanding movement patterns, not just hitting more balls. The tennis serve biomechanics framework helps you diagnose problems accurately and fix them systematically.
Video analysis combined with targeted drills gives you concrete feedback.
Featured Snippet Optimization
What is tennis serve biomechanics?
How many phases are in a tennis serve?
Why does the kinetic chain matter for serving?
The kinetic chain matters because it converts power from your largest muscles (legs) into racquet-head speed through proper sequencing, reducing injury risk while increasing power and consistency.
What is the waiter’s tray position in tennis?
| Serve Phase | Key Position | Primary Focus |
|---|---|---|
| Ready Position | Feet shoulder-width apart, knees bent | Stability and balance |
| Toss and Loading | Knees flexing deeper, weight forward | Energy storage |
| Backswing and Cocking | Waiter’s tray position, shoulder external rotation | Muscle stretch preparation |
| Acceleration and Contact | Legs extending, hips rotating, arm extending | Power generation and timing |
| Follow-Through | Racquet across body, weight forward | Deceleration and shoulder protection |
Film your serve from the side at least once per week. Small technique adjustments often become visible only on video. You don’t need professional equipment, a smartphone works fine.
Serving hard three days in a row significantly increases shoulder injury risk. Take at least one recovery day between heavy serving sessions, especially if you’re over 40 or returning to competitive tennis.
American Academy of Orthopaedic Surgeons shoulder injury prevention guidelines
Journal of Sports Medicine biomechanics research on tennis serve kinetic chain
National Strength and Conditioning Association guidelines for tennis-specific training
Frequently Asked Questions
What is the kinetic chain in a tennis serve?
The kinetic chain is the sequential transfer of energy from your lower body through your trunk, shoulders, arms, and finally your racquet. It starts with ground reaction force from your legs, continues through hip and trunk rotation, then shoulder and elbow extension, and finishes with wrist and racquet-head speed. Proper sequencing of these segments multiplies power and reduces injury risk by distributing stress across multiple joints rather than loading your shoulder alone.
How do you generate more power on a tennis serve without using only your arm?
Power comes from the kinetic chain, not arm strength alone. Drive upward through your legs during the loading phase, rotate your hips and trunk forcefully, then let your shoulder, elbow, and wrist follow in sequence. Most recreational players rely too heavily on arm and shoulder muscle, which limits power and increases injury risk. Proper leg drive and trunk rotation can increase racquet-head speed without additional arm effort, making your serve faster and more sustainable.
What are common tennis serve technique mistakes?
Frequent errors include a poor or inconsistent toss that forces compensations, insufficient knee flexion during loading, early trunk rotation that breaks sequencing, excessive shoulder shrug instead of external rotation, and a flat wrist at contact instead of a pronated finish. Many recreational players also rush the loading phase, skip the backswing entirely, or fail to transfer weight from back foot to front foot. Video analysis of your serve reveals these patterns quickly and guides targeted corrections.
How can I reduce shoulder stress when serving?
Reduce shoulder load by optimizing your kinetic chain so your legs and trunk do more work. Ensure proper shoulder external rotation in the cocking phase using the waiter’s tray position. Limit repetitive serving volume. If you have a history of shoulder issues, avoid high-spin serves initially, focus on flat serves with proper technique, and add rotator cuff stability work off-court.
How often should recreational players practice their serve?
Aim for regular serve practice sessions with at least one full rest day between sessions. Beginners benefit from shorter, more frequent sessions focused on technique and consistency. Intermediate players can extend their sessions and add match-simulation drills. Quality matters more than volume, 50 focused, biomechanically sound serves beat 200 rushed ones. Progressive drills and rest reduce overuse injury risk while building reliable technique.
Can I improve my serve significantly if I’m returning to tennis after years away?
Yes. Recreational players returning after 10+ years often improve faster than beginners because they retain court awareness and tactical understanding. Start with a solid technical foundation using proper kinetic chain sequencing rather than arm-dominant patterns. Expect noticeable improvement in serve consistency with structured practice. If you’re over 40, prioritize mobility and recovery, your serve will improve, but allow extra time for adaptation and include off-court conditioning.
What is the difference between a flat serve, slice serve, and kick serve?
All three use the same kinetic chain foundation but differ in wrist pronation angle and contact point. A flat serve uses minimal wrist rotation for maximum speed and a lower trajectory. A slice serve uses external wrist rotation and side-spin for lateral movement and a lower net clearance. A kick serve uses aggressive wrist pronation and an extreme toss position to create heavy topspin and a high bounce. Master the flat serve first to build consistent kinetic chain sequencing, then add slice and kick variations once your foundation is solid.
How can I tell if my serve technique is improving?
Track serve speed using a radar gun or smartphone app. Monitor consistency by counting consecutive serves into the box without error. Record video weekly and compare body alignment, toss position, and racquet-head acceleration. Most importantly, notice how your serve feels, smoother sequencing, less arm strain, and more effortless power indicate biomechanical improvement, not just raw speed gains.