
Last Updated: October 31, 2026
Quick Summary
To develop a winning tennis serve, build it in five steps: stance, grip and toss, then the trophy position and leg drive, then racket drop and racket-head speed, then placement, then first- and second-serve strategy. Track two numbers every session, first-serve percentage and double faults per 100 serves, and film 10 serves from behind and the side.
- Gather 40-60 balls, a tripod-mounted phone, two target cones, and a partner before your first rep.
- Aim for 15 of 20 tosses landing in a dinner-plate-sized zone above your front foot.
- Keep grip pressure light, around 4 out of 10, until the moment of contact.
- Train wide, body, and T targets, recording your hit rate at each one.
- Build a second serve you can hit 8 out of 10 times in practice before using it in a match.
Table of Contents
- How to Develop a Winning Tennis Serve: The Full Progression
- What You’ll Need Before Your First Rep
- Step 1: Build the Stance, Grip, and Ball Toss Foundation
- Step 2: Load the Trophy Position and Drive With Your Legs
- Step 3: Racket Drop, Shoulder Rotation, and Racket-Head Speed
- How to Improve Tennis Serve Consistency
- How to Get More Pace on Tennis Serve Without Losing Control
- How to Practice Tennis Serve With a Measurable Weekly Plan
- Tennis Serve Placement and First- vs. Second-Serve Strategy
- Frequently Asked Questions
How to Develop a Winning Tennis Serve: The Full Progression
Here’s a number that reframes everything: a 68% first-serve rate paired with winning 76% of those points produces a composite first-serve rating of just 51.7, according to Brain Game Tennis’s Wimbledon 2026 analysis.
Serves are built in sequence, not in a weekend. Below, we’ll show you exactly how to develop a winning tennis serve from stance to second-serve tactics. The progression has five steps, and each one earns the next.
What You’ll Need Before Your First Rep
You need four things before you hit a single serve: a basket of 40-60 balls, a phone on a tripod for video, two target cones, and a partner or coach to watch your toss. Skip the video and you’re guessing. Most players guess wrong about their own motion.
- A ball basket so you can hit 40-60 serves without chasing
- A tripod-mounted phone filming from behind and from the side
- Two cones for wide and T targets
Serve tracking has gotten serious. Sportico’s report on IBM’s serve-quality statistic notes the system tracks 21 points on a player’s body and racket 50 times per serve. You don’t need that tech. You do need the same mindset: measure something every session.
Step 1: Build the Stance, Grip, and Ball Toss Foundation
The foundation is stance, grip, and toss, in that order. Get these three right and the rest of the serve becomes far easier to teach. Get them wrong and every later fix fights the same root problem.
Foot Position, Body Alignment, and the Continental Grip
Start with your feet roughly shoulder-width apart, front foot angled toward the net post, back foot parallel to the baseline. Your body alignment should coil slightly, not face the net square. The Continental grip is the one grip that covers flat, slice, and kick serves without a change. For a deeper look at serve grip types and how each affects spin and control, see our full guide.
Toss Consistency: Location Over Perfection
Toss consistency beats toss perfection every time. The ball doesn’t need to land in the same spot every serve. If your toss keeps breaking down, these fixes for common ball-toss problems walk through each one.
Track your toss for 20 serves. Count how many land in a dinner-plate-sized zone above your front foot. If you’re under 15, that’s your first project.
Step 2: Load the Trophy Position and Drive With Your Legs
The trophy position is the loaded checkpoint: racket cocked behind the head, tossing arm still high, knees bent, hips turned. It’s where power is stored. If your trophy position is flat, no amount of arm speed will save the serve.
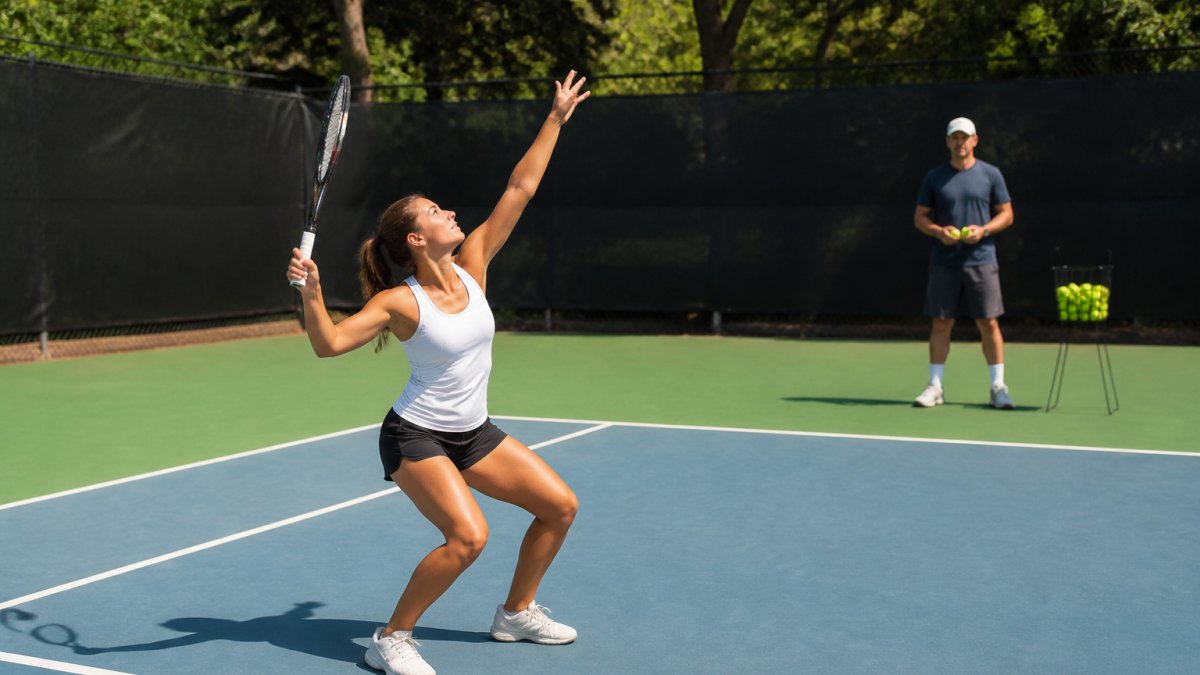
Leg drive turns that stored power into upward momentum. Bend both knees, then push up and into the court. Your contact point should rise roughly a racket length higher than your standing reach. Two checkpoints to watch on video:
- Knees: do they bend before the racket drops, or after?
- Hips: do they rotate through contact, or stay square?
If your knees bend after the racket starts down, you’re arming the serve.
Step 3: Racket Drop, Shoulder Rotation, and Racket-Head Speed
Racket-head speed comes from the drop, not from muscling the arm.
Researchers publishing in the Journal of Sports Sciences studied how reliably elite coaches and biomechanists assess serve features by eye.
Contact point should be high and slightly in front. Hit up through the ball, not down at it. Net clearance comes from height and spin, not from aiming lower.
How to Improve Tennis Serve Consistency
Serve consistency comes from repeatable rhythm, not from slowing down. If consistency is your priority, this dedicated guide to fixing serve consistency problems goes deeper.
A 2026 SwingVision guide to improving the serve recommends practicing wide, body, and T targets and tracking how often you hit each one. That’s the right instinct. Consistency is a percentage, and you can only improve a percentage you measure.
The Consistency Diagnostic: Symptom to Cause
Most serve inconsistency has one of five root causes. Use this table to diagnose from what you actually see, not from what you feel. Film 10 serves from behind and 10 from the side before you assign a cause.
| Symptom You Observe | Most Likely Cause | First Fix |
|---|---|---|
| Serves net long under pressure | Toss drifting back over the head; contact point falling behind the front hip | Rebuild the toss zone above the front foot; check contact height on video |
| Serves into the net on second serves | Deceleration at contact; aiming lower instead of adding spin | Keep racket-head speed constant and increase net clearance with spin, not with a lower aim |
| Toss inconsistent ball to ball | Tossing arm bending or releasing late; whole-body toss instead of arm-only | Toss with a straight arm from the shoulder; count 15 of 20 in zone before adding pace |
| Serve breaks down late in a match | Grip pressure creeping up; legs quitting on the drive | Reset grip to roughly 4 out of 10; cue “knees first” on every serve |
| Shoulder or elbow discomfort during serving | Serving volume too high for current tissue tolerance; arming the serve instead of driving from the legs | Cut weekly volume by roughly a third and rebuild leg drive before adding serves back |
Three Habits That Build Consistency Fast
- Same pre-serve routine every time: bounce, breath, target
- Same tempo on the toss and backswing, even on second serves
- Same finish with balance held for one second after contact
Measure It Every Session
Pick two numbers and track them for four weeks: first-serve percentage in practice and double faults per 100 serves. A realistic early target is to add measurable percentage points without changing pace. Double faults per 100 serves is the cleaner workload metric because it captures both technique and decision-making under pressure.
Film one set of 10 serves at the start and end of each session. Compare the two clips side by side rather than judging from memory.
How to Get More Pace on Tennis Serve Without Losing Control
Pace comes from the ground up, not from the shoulder. If you want more pace without losing control, the sequence is legs, hips, shoulders, arm, racket. Skipping any link forces the arm to do work it can’t do well.
A common mistake is chasing racket-head speed with a tighter grip. For a deeper dive, read how to add serve speed and spin without sacrificing control.
How to Practice Tennis Serve With a Measurable Weekly Plan
A measurable weekly plan beats random serving. Hit 100 serves a week without targets and you’ll groove whatever you already do, good or bad. Here’s the structure we recommend, with clear milestones.
| Week | Focus | Volume | Milestone to Hit |
|---|---|---|---|
| 1 | Toss + stance | 60 serves, 3 sessions | 15 of 20 tosses in zone |
| 2 | Trophy position + leg drive | 80 serves, 3 sessions | Knees bend before racket drop on video |
| 3 | Racket drop + contact height | 100 serves, 4 sessions | 70% first serves in during practice |
| 4 | Placement to wide, body, T | 120 serves, 4 sessions | 50% hit rate on each target |
| 5 | First vs. second serve | 120 serves, 4 sessions | 85% second serves in |
| 6 | Pressure simulation | 100 serves, 3 sessions | Win 60% of practice tiebreak points |
Film one set of 10 serves each week from behind and from the side. Compare the video to the milestone, not to your feelings.
Tennis Serve Placement and First- vs. Second-Serve Strategy
Placement wins matches more often than raw pace. A 110 mph serve down the middle is easier to return than a 95 mph serve to the wide corner. Train targets, not just power.
The Three Targets and When to Use Each
Every serve goes to one of three zones: wide, body, or T. Each does a different job.
- Wide: pulls the returner off the court and opens the opposite side for the next shot. Best against a returner who stands close to the baseline or cheats toward the middle.
- Body: jams the returner’s swing and produces weak, short returns. Best against a big backswing or a returner who loves to extend.
- T: cuts the return angle and sets up the next ball through the middle. Best against a returner who stands far behind the baseline or struggles with high backhands.
In practice, hit 20 serves at each target and record your hit rate. Players often find one target is weaker than the others, and that is the one to train first.
First-Serve Strategy: Attack the Weaker Side Early
First-serve strategy: attack the weaker side early in the point. If your opponent’s backhand return is shaky, serve to the body or the backhand corner. If they stand wide to protect the backhand, go T.
A practical rule: on first serves, accept a lower percentage in exchange for a higher chance of a weak return. Aggressive first-serve targets can produce better point outcomes than conservative ones, because the return quality can drop sharply.
Second-Serve Strategy: Protect the Percentage
Second-serve strategy: protect your percentage. Aim for a higher net clearance, more spin, and a target you can hit 8 out of 10 times in practice.
Build a second serve you can hit reliably in practice before you use it in a match. For practical steps to avoid double faults under pressure, see our step-by-step guide. If your practice rate is below that, the serve is not ready, pick a safer target or add more spin until it is.
Balancing Risk Between the Two Serves
Think of the two serves as a risk budget. The first serve spends risk on placement and pace; the second serve spends risk on spin and margin. If your double-fault rate climbs, you may be overspending on the second serve, either the target is too aggressive or the motion is decelerating under pressure.
Chasing aces on second serves is the fastest way to lose a tight set. Double faults come from decelerating under pressure, not from the toss. When you feel tight, shorten the target and keep the racket-head speed the same.
Tactical Decision-Making Within a Point
Use the serve to set up the next shot, not to end the point. A wide serve to the deuce court opens the middle for the next ball; a T serve in the ad court pulls the returner into the middle and opens the wide forehand. Decide your target before the toss, not during it, mid-motion decisions are where technique breaks down.
Frequently Asked Questions
How long does it take to develop a reliable tennis serve?
It depends on your starting point and how often you practice with intent. A player who trains three to four times a week with target-based drills can see measurable gains in toss consistency and serve percentage within four to six weeks. Full mechanical change, such as rebuilding the racket drop or leg drive, usually takes a few months of deliberate reps. The key is tracking targets hit and first-serve percentage each session so progress is visible rather than guessed.
How can I improve my tennis serve consistency without losing power?
Consistency comes from repeatable inputs, not from swinging slower. Lock in your toss location, keep the same rhythm from the first ball to the last, and track how often you hit your chosen target. Practicing wide, body, and T targets and recording how often each is hit is a useful approach. When your toss and trophy position repeat, you can swing freely because the contact point stops moving on you.
What causes a tennis serve to lack power?
Most power loss traces back to the kinetic chain breaking down before contact. If the knee bend is shallow, the shoulder rotation stalls, or the racket drop is short, the arm ends up doing work the legs and trunk should do. Placement and pace are best evaluated together rather than separately. Fix the sequence first, then add speed.
How should I practice my tennis serve in a typical week?
Split serve work into short, focused blocks rather than one long session. Two or three 25-minute sessions per week is enough: spend the first five minutes on toss practice, then hit 30 serves at one target, then finish with 15 pressure serves where you call the target out loud. Track targets hit and double faults in a notebook. Progressive milestones, such as hitting 6 of 10 serves to the deuce T, keep the work measurable.
Your serve doesn’t need to be perfect. It needs to be repeatable, measurable, and built in the right order. If you’re tired of guessing which link is broken, Crunch Time Coaching gives you step-by-step daily lessons, a challenge-based curriculum, and in-person training camps where a coach can see your motion up close and fix it. Get started with Crunch Time Coaching and turn your serve into the part of your game opponents dread.
