
Table of Contents
- Why Tennis Cone Drills Build Agility and Court Speed
- Setting Up Your Cone Layout for Maximum Training Effect
- Tennis Footwork Drills for Beginners Using Cones
- Tennis Split Step Training With Cone Markers
- Advanced Cone Drills: Reaction Time and Change of Direction
- Building Explosiveness and Stamina With Cone Circuits
- Injury Prevention and Biomechanics in Cone Training
- Common Mistakes to Avoid During Cone Drills
- Frequently Asked Questions
Last Updated: October 1, 2026
Why Tennis Cone Drills Build Agility and Court Speed
Tennis cone drills agility training is among the most effective ways to develop the footwork and lateral movement that separate competitive players from the rest. These drills train your body to change direction quickly, accelerate explosively, and decelerate under control, all essential skills on the court.
Cone work requires minimal equipment, just a few cones and open space, yet develops lateral quickness, reaction time, and change of direction with purpose and precision.
Consistent cone training delivers measurable improvements in court coverage and movement efficiency within 3-4 weeks, teaching proper biomechanics and explosive stamina.
Setting Up Your Cone Layout for Maximum Training Effect
Cone spacing determines movement patterns and match transfer. Spacing must match your skill level, training objective, and cone type.
Cone spacing optimization for different skill levels and drill types
Closer spacing develops rapid foot turnover and proprioceptive control; wider spacing builds stride length and explosive power. Match spacing to your ability level.
Beginner spacing (2-3 feet apart): Use tighter spacing to develop quick feet and rapid direction changes. Perform 10-15 repetitions per drill for 2-3 weeks before progressing.
Intermediate spacing (4-5 feet apart): Increase spacing to develop longer strides and explosiveness. Perform 8-12 repetitions per drill for 3-4 weeks before advancing.
Advanced spacing (6-8 feet apart): Use wider spacing to build court speed and match-realistic patterns. Perform 6-10 high-intensity repetitions and train deceleration control.
Reaction drill spacing (1.5-2 feet apart): For drills where a partner calls out cone targets or you respond to visual cues, use tighter clustering. This setup demands faster decision-making and sharper cuts. Your nervous system learns to process information and respond instantly, mimicking the unpredictability of match play.
Cone type and surface considerations
Not all cones are created equal, and the type you choose affects training outcomes.
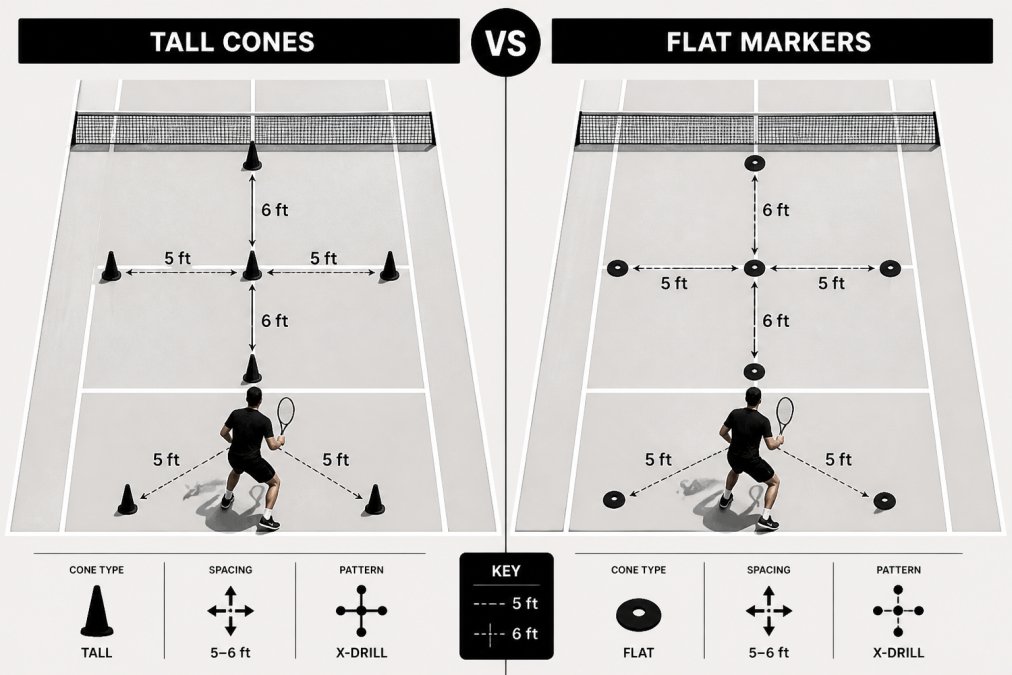
Tall cones (12+ inches): Visible from a distance and durable for outdoor surfaces, but create a tripping hazard during lateral movement. Use for linear sprints and acceleration work.
Flat markers (1-2 inches): Safer for lateral movement and easier to touch during rapid direction changes. Ideal for indoor training and multi-directional drills.
Hard court vs. clay vs. grass: On hard courts, cones stay in place reliably. On clay courts, cones can shift during rapid deceleration, so use weighted cones or flat markers taped down. On grass, use flat markers or weighted cones to prevent movement. The surface affects how your feet interact with the ground, hard courts demand sharper deceleration control, while softer surfaces allow more slide.
Marking your cone layout for precision
Use colored cones or tape to create visual targets and reduce setup time. Use a measuring tape to ensure consistent spacing, which prevents inconsistent movement patterns.
Tennis Footwork Drills for Beginners Using Cones
If you’re new to cone training, start simple. Master basic footwork patterns before progressing to complex drills. The goal is to build solid movement habits that you can perform under pressure.
The lateral shuffle: building side-to-side speed
The lateral shuffle is the foundation of tennis footwork. This drill teaches you to move sideways quickly while maintaining balance and court positioning.
Set up two cones 8 feet apart. Shuffle laterally to each cone, touch it, return to center. Perform 10 repetitions in each direction. Keep knees bent, shoulders square, feet moving in short controlled steps. Perform 2-3 times per week for 2 weeks before progressing.
Crossover step technique through cone gates
Create a gate with two cones 3 feet apart. Sprint toward the gate, plant your outside foot, cross your inside leg over, and accelerate through. Perform 5 repetitions in each direction, rest 60 seconds between sets, complete 3 sets total. This teaches explosive change of direction and faster court coverage.
Tennis Split Step Training With Cone Markers
Place cones in a circle 6 feet apart. Perform a split step, shuffle to the nearest cone, touch it, return to center. Repeat with each cone. Perform 15-20 repetitions, rest 45 seconds, complete 3 sets. This develops the timing and positioning needed to react instantly during match play.
Advanced Cone Drills: Reaction Time and Change of Direction
Once you’ve mastered basic footwork, introduce reaction-based drills. These drills develop your ability to process information and respond instantly, a critical skill in competitive tennis.
Reactive footwork drills with partner cues
Set up 4 cones in a square pattern 4 feet apart. Have a partner call out cone numbers or point to cones. Sprint to each cone as fast as possible. Perform 20 repetitions, rest 90 seconds, complete 3 sets. This simulates match conditions and develops instant reaction time.
Acceleration and deceleration through cone sequences
Set up 5 cones in a straight line 6 feet apart. Sprint from cone 1 to cone 5, decelerating as you approach each cone. Walk back to start. Repeat 5 times. This trains controlled deceleration and reduces injury risk. Complete once per week.
Building Explosiveness and Stamina With Cone Circuits
Create a 4-station circuit: lateral shuffles (30 sec), crossover steps (30 sec), cone sprints (30 sec), split step reactions (30 sec). Rest 60 seconds between rounds, complete 4 rounds. Perform once per week. Most players see significant improvements in explosive endurance after 4-6 weeks.
Injury Prevention and Biomechanics in Cone Training
Proper movement mechanics protect your joints and maximize training adaptation. Poor technique creates injury risk and teaches patterns that fail under match pressure.
The biomechanical foundation: four critical movement principles
Knee alignment and valgus collapse prevention: Knees should track over toes during lateral movement. Inward knee collapse increases ACL and MCL stress. Prevent it by engaging hip abductors, push knees outward during lateral shuffles. Film yourself from the front to check alignment.
Hip engagement and force distribution: Drive movement from your hips, not just your feet. This distributes force across large muscle groups and prevents injury. Think “hips first, feet follow.”
Single-leg landing control and eccentric strength: Control landings by landing on the ball of your foot, bending your knee to absorb force, and keeping your torso upright. During the first 3 weeks, perform landing drills slowly, holding each position for 2 seconds before moving to the next cone.
Deceleration control and force management: Slow down deliberately by “sticking” your landing, plant your foot and stop completely rather than sliding.
Progressive warm-up protocol for cone training
A proper warm-up reduces injury risk and improves training quality. Phase 1: Light jogging (2 min). Phase 2: Dynamic mobility, leg swings, lunges, inchworms, squats, lateral lunges (10 reps each). Phase 3: Activation, glute bridges, lateral band walks, single-leg balance (10 reps each). Phase 4: 5 slow repetitions of your first drill at 50% intensity. Total time: 10-15 minutes.
Cool-down and recovery protocol
Your body adapts to training during recovery, not during the training itself. A proper cool-down accelerates recovery and prepares you for your next session.
Phase 2: Static stretching (5-7 minutes): Hold each stretch for 30 seconds. Perform 2 repetitions of each:
- Hip flexor stretch (lunge position, lean forward)
- Hamstring stretch (forward fold or seated)
- Calf stretch (wall or step)
- Lateral hip stretch (figure-4 position)
- Quad stretch (standing or lying)
Progression timeline for building safe, efficient movement
Weeks 1-2 (Foundation): Perform all drills at 50-60% intensity with perfect form. Use beginner spacing (2-3 feet). Perform drills 2-3 times per week with at least one rest day between sessions. Focus entirely on movement quality. Your nervous system is learning the correct pattern.
Pain vs. soreness: knowing when to stop
Muscle soreness is normal; sharp pain indicates a problem. Soreness is a dull ache that appears 24-48 hours after training (delayed-onset muscle soreness, or DOMS). Sharp pain during or immediately after training is a warning sign.
Do not train through sharp pain. Continuing to train on an injury compounds the problem and extends recovery time. A 2-3 day break now prevents a 2-3 week injury later.
Common Mistakes to Avoid During Cone Drills
Most players make predictable mistakes that limit their progress. Avoid these patterns and you’ll develop faster than your competition.
Time your cone drills early in your training session when you’re fresh. Your nervous system learns movement patterns best when you’re not fatigued. Save general conditioning work for later in the session.
Frequently Asked Questions
How many cones do I need for effective tennis agility training?
Start with 6-8 cones for basic drills like lateral shuffles and crossover steps. For advanced circuits and reaction drills, 10-12 cones give you more spacing options and realistic court coverage. Cone spacing ranges from 3-6 feet depending on the drill, closer spacing builds quickness in tight areas, wider spacing develops longer-stride lateral movement. You can always add more cones as your footwork improves and you progress to complex patterns.
What’s the best way to set up a tennis agility course with cones?
Start with a T-shaped or L-shaped layout for beginners, this teaches directional changes without overwhelming coordination demands. Space cones 4-5 feet apart for footwork drills for beginners. As you advance, create figure-8 patterns, zigzag lines, and box formations to challenge lateral movement and change of direction. Always leave clear space around your cone layout to prevent tripping, and position cones on flat court sections to maintain balance during high-intensity work.
How do cone drills improve my tennis footwork and serve consistency?
Cone drills train the explosive lateral movement and split step timing your serve depends on. Better footwork positioning means a stable base for your serve motion. Drills that build quickness and coordination through cone sequences enhance your ability to recover to center court after serving, setting up your next shot. Regular cone work also strengthens the deceleration control needed to prevent injury during the explosive serve motion, which protects your consistency over long matches.
Can I do tennis cone agility drills at home or on any surface?
You can train on any flat surface, grass, hardcourt, or even a driveway, but hardcourt surfaces are ideal because they’re consistent and reduce injury risk. If you’re training on grass, mark your cone patterns clearly since cones can shift. Avoid wet or uneven surfaces that compromise your landing mechanics and increase ankle strain. Indoor gym spaces work well too, though you’ll need at least 20 feet by 20 feet of clear space for full cone circuits. Always prioritize surface stability over convenience.